Adho Mukha Svanasasa ~ Downward Facing Dog
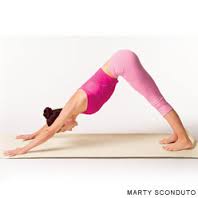 Downward facing dog is a pose that you see in just about every yoga class. It isn't always done effectively or safely though. When I teach this pose in class I tend to say the same thing each time: arms shoulder width apart, wrist creases parallel to the front of your mat, middle fingers parallel to the sides of your mat, let the shoulders come away from the ears and draw shoulder blades onto your back. Lift the sitting bones toward the sky as you press the heels toward the floor. Lots of instruction there, so let's break it down a bit.Start in a kneeling position with the knees directly underneath the hips and the hands underneath the shoulders. People have a tendency to think that their shoulders are much wider than they are, so have a look while you're in the kneeling position. Widen your fingers apart to make them active and press all if your knuckles into the floor evenly. Pay special attention to the index finger and thumb. There is a small bone in the outer wrist called the pisiform that can be compromised when too much weight is put on the outer part of the wrist. Ensure that the creases in your wrists stay parallel to the front edge of your yoga mat and that the middle fingers stay parallel to the side of your yoga mat. Keep the hands in this position throughout downward facing dog. From this kneeling position, engage your abdominal muscles, curl your toes under and lift your sitting bones up to an inverted v position. Straighten the legs as much as is comfortable without putting strain on the back. Think of lifting the sitting bones up as you press your heels toward the floor. It may not be possible to bring the heels all the way to the floor, practice patience. When you lift the hips you may feel like you want to widen your arms. This is likely because your shoulders are on the tight side. Allow the shoulders to open gradually. Think of allowing your heart to melt between the shoulders until the ears are in line with your upper arms. Keep the spine straight and continue to lift your sitting bones. Breathe deeply allowing your back body to fill and expand with your inhalation and then let the heart melt a little bit more on your exhalation. Take your time getting there, never force yourself into a pose. Just let your shoulders and hamstrings to open in their own time.Now think about your legs. Have a look at your knees and ensure that they are pointing forward. Inner spiral your inner thighs by turning them back as if you are widening your pelvis. Now outer spiral your outer thighs by turning the outer thigh muscles back. By inner and outer spiraling your thighs you engage all muscles giving lots of support to the hamstrings which are in a fairly deep stretch. Hold the pose for a couple of minutes if possible, or as long as you can comfortably. In time this pose will feel like a resting position, but it doesn't usually feel that way when you first start doing yoga. The wrists and trapezius muscles in the back will get stronger, the shoulders and hamstrings will become more open and the pose will feel wonderful - in time.